
![]()
![]()
![]()
![]()
![]()
Tools & Techniques
Photo-Backpacks, Guides, DoF
Stephen C. Peterson
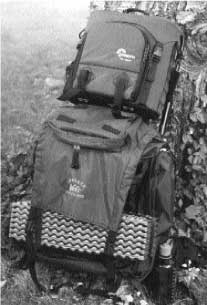 I have a love-hate relationship with photo-backpacks. They are great for carrying your camera gear short distances but lack space for water, munchies, rain gear, etc. when you need to hike a substantial distance from the car. The photo packs usually have loops for attaching accessory compartments but those add weight (to an already heavy pack) and always seem to flop, snag, and get in the way.
 The non-photo backpacks usually are top loading so you have to dig for your lens or loupe that has somehow migrated to the bottom. Those few “panel” loader packs (hard to find) often have small panels that limit access to equipment. In addition, you have to wrap your photo equipment as the regular backpacks lack padding. This again slows operation because it requires first finding and then unwrapping the gear. These packs often have attached pockets for food, water and straps for clothing and tripods.
My frustration has led my wife to call me “packman” as I am now up to 14 packs of one sort or another and counting. My latest addition, which I hope will work for the overnight photo-hike, is a pack with an aluminum frame. I know it looks old fashion but the addition of a photo-pack gives me two separate compartments, one for camping gear and another for camera equipment.
Most frame packs have the pack in the center of the frame with space above and below for tent sleeping bag ground pad, etc. I moved the pack to the bottom of the frame giving me space above for the camera pack, a Lowepro Trim Trekker. That pack is attached to the frame with mini-carabiners allowing me to detach it easily for short side trips freeing me from carrying the whole works. The Trim Trekker carries a medium format body, 3 lenses, light meter, filters and film.
Haven’t tried the 4x5 in it yet but it should be capable of carrying it and 3 lenses, with extra film in the main pack. The tripod, normally attached to the frame, is hand carried for the side trip or can be attached to the Trekker.
The main pack carries the camping gear inside and in attached pockets. Photo camping (without llamas) requires really lightweight gear. I have picked up a 3 pound 1-man tent (MSR Zoid 1&Mac250;) and a “Sub-kilo” sleeping bag at a little over 2 pounds. The sleeping pad at 11 ounces, doubles as a ground sheet for the tent, Clothes are what you wear, no stove (saves about 2 lbs), food bars, nuts, foil pack tuna kit(s) and pita bread are my food.
These days you can’t drink the water anywhere without risking Giardia or hepatitis, so water treatment or purification is a necessity. The PUR Hiker&Mac250; filter is under a pound and I carry some chlorine treatment for any viruses that may slip through. Wind and rain gear are strapped to the pack. A lot of my hiking is done in southern Utah so 60 feet of 6mm rope is often included to raise or lower the pack as needed. Knife, fire starter, T-Paper (and a baggie for carrying it out) and other personal items complete the equipment.
Guidebooks
OK where to hike? Several guidebooks that I feel are excellent are: Photo-graph America Newsletter, 415-898-3736, www.photographamerica .com. Falcon guides, 800/582-2665, www.falconguide .com. Both these sources cover most of the USA. My favorites for the southwest are Photographing the Southwest, Vol. 1 & 2, by Laurent Martres (www.phototripusa.com). Laurent gives detailed site finding information as well as when best to photograph the area. Backpacker and Outdoor Photographer are good magazines for discovering where to explore as well.
Depth-of-field Revisited
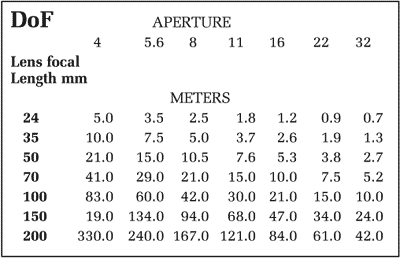 My wife, Maria, is struggling with the transition from point and shoot to a “real” camera and wanted some practical, easy way to determine depth-of-field (DoF). In the July/August 2001 issue of Photovision, Tools & Techniques detailed zone focusing zoom lenses but gave only an equation for DoF. The accompanying table may be copied and used in the field. It provides hyperfocal distances in meters for a circle of confusion of 30 microns (suitable for 35 mm film size). The hyperfocal distance is where you set focus to get everything sharp from infinity to one half the hyperfocal distance.
An example: After composing your photo of wild flowers in the mountains you have zoomed to 35mm focal length. The closest flowers are about 3 feet (1 meter) away from the camera. You want both the flowers and the mountain sharp. This requires a hyperfocal distance of (two times the 1 meter distance) 2 meters.
From the table, for a 35mm lens you find 1.9 meters under the f/22 aperture value. So set the aperture at f/22 and the focus at 2 meters. Everything from 1 meter to infinity will be acceptably sharp. For a similar photograph of mountain and flowers using a 200mm lens at f/22, you would need to focus at 60 meters (180 feet) in order for the flowers as close as 30 meters (90 feet) and the mountains to be in focus. Using a larger f/stop, say f/16, means that focusing at 84 meters (252 feet) your closest flower in focus would be 44 feet away.
Practically speaking, by the time you focus at 84 meters your lens is at infinity, so you can use the chart to tell you what the closest object in focus will be simply by dividing the hyperfocal length at a given f/stop for anything past the last measured distance on your lens.
- Stephen Peterson has advanced degrees in physiology, biophysics and electrical engineering and has been involved in photography for 50 years. Steve enjoys medium and large format landscape photography, both black & white and color. He is also the owner of Summitek, a small photo-products business.
. |
 |