![]()
| Photography
Articles and Techniques Bare Bones Vintage Cameras By: Paul Lewis From Vol. 1 No. 2 With all the options of large format equipment available today, it is easy to get caught up in the best, the fastest, the most expensive. It is worthwhile stepping back sometimes and trying the minimum. This is one example, an old Pony Premo No.3 plate camera modified to use modern sheet film and a Taylor, Taylor & Hobson Cooke Anastigmat F6.3 162 mm that came off a Kodak 3A folder. This is nothing fancy, just the bare bones. As portraiture and some types of landscapes do not require a lot of camera movements, a good piece of glass will do well, even if it comes from humble beginnings.
|
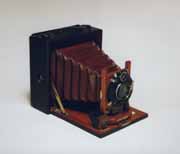 Vintage Pony Premo No.3 Plate Camera 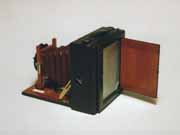 Pony Premo rear view 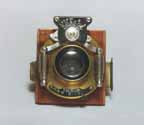 Bausch and Lomb Rapid Rectilinear in a pneumatic Victor shutter 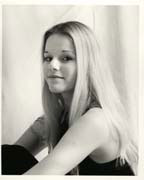 This portrait detail illustrates the image quality of the Cooke triplet lens on the Pony Premo. It is a little soft because I exposed it at f/8 - nearly wide open on the f/6.8 lens. I was limited by the light and did not want to shoot slower than 1/2 second. |
Focus Test
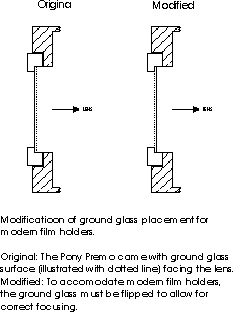
A very simple but effective focussing test can be done using playing cards, held up by clothes pins on a table. Stagger the cards 6 inches apart, at an angle from the cameraís point of view. Set the camera 6 feet from the middle card. Shoot wide open, for the minimum depth of field. The three cards in front and three cards behind are enough to tell you how accurate your focussing is. If the centre card is not the sharpest, then you adjust the ground glass offset.
This test gave me a very interesting result with the original lens that came with my Pony. It was a Bausch and Lomb Rapid Rectilinear in a pneumatic Victor shutter. Very pretty and it worked well for a while. Unfortunately, the shutter became erratic and didn't give consistent speeds. Well, as it is a hundred years old. I understood that it had just got tired.
However, it was the lens that was the mystery. When I developed the test negative, it seemed, at first, that it was focussing properly. The centre card was in focus, but so was the left hand corner of the table, nearest the camera! I would have to arrange my photos so that anybody on the left hand side would have to stand real close. The lens elements do not look misshapen and the lenses are square in their mounts. All I can figure is that the glass is not homogeneous and that one side of one of the elements has higher refractive indices than the other. In other words, they didnít stir the mix well enough when they made the glass! It's a very nice paper weight now.
A Word About Compound Shutters
I want to add a cautionary note about Compound shutters. They are not the "dunk in solvent, if it's slow," kind of shutter. Donít do it. The aperture blades are made of paper. They do not take kindly to getting wet and they don't work well after that! If your Compound is slow and doesnít respond to firing the shutter a dozen times on every speed, then have it cleaned and lubricated by a qualified camera tech. Exercise mechanical shutters every six months. Regular use keeps these shutters happy. So, get that olí plate camera out of the closet and try taking some pictures with a bare bones vintage camera.
*Bokeh is a Japanese word for the image that the lens produces outside of the plane of sharp focus. Different lens types produce different kinds of bokeh; some smooth and some very harsh and distracting. It is unnoticed by most because they only pay attention to what is in focus in the picture. It is a subtle, but important factor in our aesthetic response to an image.
Paul Lewis is a photographer, photochemist and metalsmith living in Canada, who enjoys the pleasures of classic cameras and infrared photography.
. |
 |