|
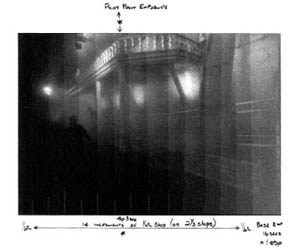
Print 1 - F-STOP TEST STRIP - Base exposure 16 seconds = 1 stop + 14 increments of 1/6th stop or 21/2stops. Boardwalk - Ocean City - June 2000.
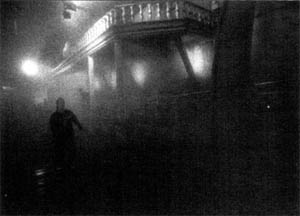
Print 2 - PILOT PRINT - Exposure 16 seconds +(8 X 1/6th stop or 1 1/3 stops) = 40.3 seconds.
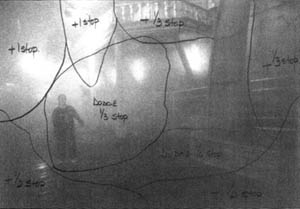
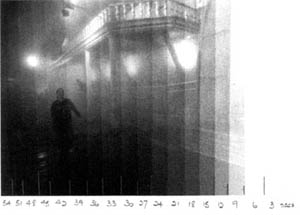
Print 3 - BURN & DODGE DIAGRAM - Exposure 43.3 seconds plus burning and dodging as shown.
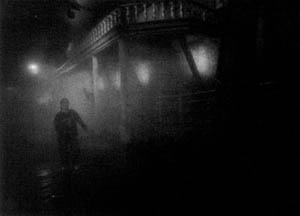
Print 4 - FINAL PRINT.
 Print 5 - LINEAR TIME TEST STRIP - Three second increments. Print 5 - LINEAR TIME TEST STRIP - Three second increments.
PHOTOS © 2001 LES MCLEAN PHOTOGRAPHY.
ALL RIGHTS RESERVED
|
|
To understand the concept of f-stop printing we need to accept that the terminology relates to both in-camera exposure and the darkroom stage. Perhaps the best definition of photographic exposure that I can offer is: a volume of light where the volume is the product of an area times a length. In photographic terms, the area is the aperture of the lens and the length is the time the shutter is open.
F-stop Printing in Practice
In the following description of f-stop printing I will assume that the correct paper grade has been chosen and that processing times in developer, stop and fix are normal. I use an f-stop timer made in the UK* which allows me to select 1/2, 1/3, 1/4, 1/6, 1/12 or 1/24 f-stop increments in test strip mode. In addition, it has a built in compensating factor designed for use with my Zone VI Cold Cathode VC enlarger together with a percentage print dry down feature.
The Test Strip
My starting point in making a fine black-and-white print is the test strip. Using linear timing (Print 5, following page) the rate of density change in the steps is not constant. The f-stop test strip (Print 1, previous page) shows a constant density change throughout giving a more accurate choice of exposure options.
My f-stop test strip method is as follows; set the timer into test strip mode and select the preferred f-stop increment, select a base time and expose the whole test strip. Based on the increment chosen the timer will calculate the correct exposure for each subsequent step of the test strip (Print 1). Ideally, the correct exposure should appear somewhere in the center of the test strip thus allowing you to determine the degree of burning and dodging required when making the final print.
I never select the first or last step on any test strip as the chosen print exposure, for I would not have a reference point before the first or after the last step. I believe it is essential to have this reference point in order to make comparisons and the decision relating to the correct exposure.
Burning and Dodging
Working in f-stops allows precise control when burning and dodging. I tend to favor working in units of 1/6th of a stop. Because my f-stop timer is programmable, it can be set up in advance to accommodate all burning-in requirements in sequence. Dodging is carried out during the base exposure.
Having made the choice of base exposure from the test strip, make a pilot print (Print 2) at that exposure to determine where it is necessary to burn and dodge (Print 3). When burning in, work on relatively small areas of the print. This gives more control and prevents obvious signs of manipulation.
Repeatability
A major benefit in using f-stop printing is apparent when you need to make different size prints from the same negative. When making the reference print, make a note of the burning and dodging information in increments of f-stops (Print 3). When making subsequent prints from that negative, give a base exposure that produces the same tonality as the reference print. The burning and dodging required is given the same f-stop increments as the reference print. Given that the same grade paper has been used, the print will be virtually identical to the reference print, regardless of the changes of base exposure brought about by differences in the size. To achieve the same result with linear timing in my print making, it is necessary to work out percentages of the base exposure in order to determine burning and dodging information when changing print size.
The f-stop method described here has enabled me to produce re-prints faster, and with more consistency than ever before.
The Importance of Timing
While this article is about f-stop printing I think it is necessary to say a little about timers. Traditional linear timers can be used in f-stop printing, but it is necessary to manually set each step, which is time consuming and could be confusing, sometimes leading to mistakes.
My f-stop timer has been available in the UK for about five years. It is fully programmable with two channels for use with split grade printing, a soft start option that allows for bulb warm-up time and a foot switch, in addition to the dry down and compensating features mentioned earlier. I do not know if there is a similar timer currently available in America, but Calumet is planning to market this one in the near future. It is definitely worth a look.
Conclusion
When I first considered f-stop printing I was skeptical and felt that it offered limited benefits in my darkroom work. How wrong I was. My printing has improved because of the finer, constant increases in density on the test strip. This feature has enabled me to apply more accuracy in my judgement when assessing the test strip. Consequently, my prints show a better tonality and my printing has certainly speeded up. I did need to spend a little time in learning to understand the timer and the concept of f-stop printing. Having done that I have never regretted the decision to use the method and now urge all those photographers who attend my workshops and classes to try it. I would urge you to do the same and feel certain that you will not regret it.
Les McLean specializes in landscape and documentary photography and has established himself as one of the top black-and-white printers in the UK. Originally from the border country of England and Scotland, Les travels around the UK teaching photography in leading universities and art colleges. Over the past 10 years he has written numerous articles for UK magazines and is currently featured as a columnist in Practical Photography. Les is currently working on his first book due to be published in 2002.
|