![]()
![]()
![]()
![]()
![]()
6" Behind the Lens
Develop for the Highlights
By Thomas Harrop
From Vol. 1 No. 3
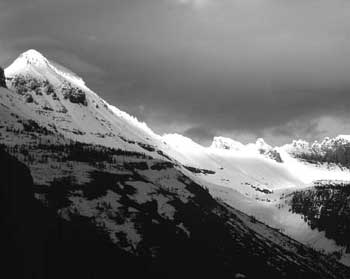 Glacier National Park, Montana © 2001 Thomas Harrop. In the last issue of Photovision, we presented Part One of a brief introduction to the Zone system. We examined a way to determine exposure based on taking a meter reading of the darkest shadow in which we desire detail in the finished print. In other words, expose for the shadows. While the Zone III placement we discussed is the traditional placement for this shadow value, it should be noted that there are other possibilities. Henry Gilpin and others use Zone II as the basis for exposure, while Bruce Barnbaum suggests using Zone IV. Once you have worked with the system for a while you can make your own decision about which tonal values work best with your personal vision. The next step in creating fine photographic prints is to tailor our development to the scale of the scene and our materials. This brings us to the other end of the old adage, “...develop for the highlights.” [Developing for the highlights involves what many photographers term pushing or pulling the film’s development.] In Zone terms, increasing and decreasing development time is termed expansion or contraction. Expansion is the extension of development time to permit building greater highlight density; contraction is the opposite. High Ho Silver Since highlights convert to contain much more chemically changed silver halide than shadows, the highlight areas see more density change from changes in development time than the shadow areas. The Zone System exploits this difference to allow photographers to add density to the highlights of negatives which have too little contrast, or to reduce highlight density in scenes that would otherwise build too much density. This is accomplished by taking two meter readings from the scene you are photographing. We have already taken a Zone III reading to determine the placement of our shadow value, and therefore our exposure. To determine how the film should be processed, we will take one more reading in the scene. This will be the brightest highlight in the scene which we want to reproduce with detail. In Zone terms this is called Zone VII. In any scene we are seeking a four stop exposure difference between Zone III and Zone VII. This is simply because there are four steps or zones between III and VII. If you make your spot meter readings of the textured shadow and highlight and they are four stops apart, you need not do any more. With normal processing you will produce a negative with a tonal range that will reproduce well on normal grade paper. It is possible through testing to determine the times for expansion and contraction but it is a rather tedious and somewhat expensive prospect. As an alternative I suggest consulting Chris Johnson’s fine book, The Practical Zone System, which contains tables showing processing times for a large variety of film and developer combinations. Using Johnson’s times as a starting point you can begin to test and evaluate your negatives based on their highlight density. If the highlights are too dense at a given processing time you should reduce the time [see “Photo Hints” on page 64 of this issue for another way to calculate these expansion and contraction times.] Once you have used the system for a while you can create your own set of adjusted development times. You’ll be surprised how quickly you go from wondering why your negatives are so difficult to print to concentrating all your attention on interpreting your subject in new and exciting ways. In the next issue we will look at the mechanics of exposure and development in the Zone System. Thomas Harrop is a photographer and full-time photography instructor at the Art Institute of Colorado in Denver. He has both bachelor’s and master’s degrees from Brooks Institute of Photography, is a member of the Royal Photographic Society of Great Britain and has been listed in Who’s Who in Media and Communication. He has served on staff at several national photo magazines and worked as a professional photographer for nearly 20 years, both freelance and on staff for NASA at Edwards Air Force Base. |
. |
 |